Monday, July 30, 2012

Western Homestead Shanty by Life-Like Trains Part 2 | Water Tank and Windmill

Also part of Life-Like Train's Western Homestead Shanty model kit is this Water Tank and Windmill.

The main challenge here was putting together all those wooden struts together cleanly, without using too much glue. As always, Tamiya Extra-Thin cement is the best model kit glue for this type of intricate handiwork.

Model Kit Life Like Trains Western Homestead Shanty
Life-Like Trains Water Tank and Windmill.

I painted the water tank, wooden supports and windmill struts with Humbrol's Matt Dark Brown.

Realistic, but pretty dull.

I think I will get hold of some matt dark green paint and paint over the wooden supports, just like the suggested paint scheme on the image on the box.

The blades on the windmill came pre-painted, or should I say, electroplated, a nice brushed-aluminum. It looks pretty good, so I'll leave that as is. Plus, it's nearly impossible to get that high degree of electroplated smoothness with regular brush-on paints, especially for plastic parts that are supposed to look metallic.

Model Kit Life Like Trains Western Homestead Shanty
Detail of water tank, wooden struts and supports, with wood barrels added in this picture. The white fence is for keeping the longhorn steer off the railroad tracks!

The Western Homestead Shanty kit also comes with an assortment of barrels and even a couple of longhorn steer. Family pets, perhaps?

Time to get rid of those ugly, factory-painted white spots on those longhorns, too.

You can read about how I modelled and weathered the Western Homestead Shanty, complete with hanging laundry, in this earlier post:

Western Homestead Shanty by Life-Like Trains


Monday, July 23, 2012

Model Kit | Station Platform by Atlas

A model railroad is not quite complete without a station platform.

I had purchased a OO scale station platform by Hornby a while ago -- you know, the grey plastic one that looks a little like a 1/350 scale model aircraft carrier.  Bringing it home, I found it too large to place anywhere on my layout. Funny how things seem a lot smaller when we look at it in the hobby shop. That, and it also lacked the rustic feel that is the main theme of The Sunny Model Railroad.

Atlas Station Platform Model Kit
Station Platform kit by Atlas in HO Scale

My better half found me the perfect station platform in a little train hobbyshop in Melbourne, Australia, of all places. The Station Platform by Atlas was just the right size for my layout and it had that all important rustic vibe I was looking for.

Atlas Station Platform Model Kit
You can see the two halves in the roof that make up the Atlas Station Platform. The modeller has the choice of building either a shorter platfrom using just one half, or a longer platform with both halves glued together.

The Atlas Station Platform kit is actually made up of two halves. You have the option of using just one half of the kit for a smaller station, or both halves glued together to see the longer station platform you see in these pics. I assembled this kit with good 'ol Tamiya Extra-Thin Cement.

Painting this kit was pretty simple -- Model Color's Basalt Grey for the station platform's roof and Cork Brown for the station pillars. Humbrol Silver was used for the station lamps.

Atlas Station Platform Model Kit
Seated figures and baggage handlers are by Woodland Scenics,

Also included in the kit are benches for the passengers, a slightly oversized hand trolley and a luggage weighing scale. I suspect the oversized hand trolley is actually in OO scale. I might relegate it to the spares drawer once I find some more platform accessories to add to the station.

Atlas Station Platform Model Kit
A leather jacketed figure seated on the oversized hand trolley. Contemplating the scenery, I presume? 

The seated Woodland Scenics figures are from the 'People Sitting' set in HO scale. I was amazed at how perfectly they fit on the benches in their sitting positions, their feet exactly touching their ground. The baggage handlers are from Woodland Scenics 'Train Personnel' set. All figures are attached with Scenic Accents glue.

I'm thinking of wiring the station platform up with a small bulb for evening commuters. More on that later.. if I get around to it, that is.


More model kit buildings on The Sunny Model Railroad:

Western Homestead Shanty by Life-Like models

Country Chapel by Faller

Sanding Tower Model Kit by Faller

Atlas Picket Fence and Gate Kit

Constance Signal Tower Model Kit by Faller

House Under Construction Model Kit by Faller

Gantry Crane Model Kit by Faller


Sunday, July 22, 2012

Model Kit | Gantry Crane by Faller

I'm quite a fan of Faller model kits, especially their railroad work structures.

This Gantry Crane by Faller was really easy to assemble. All the parts fit together seamlessly, and I had the whole thing put together in less than half an hour.

I love it when a model kit comes together this easily!

Model Kit Faller Gantry Crane
Gantry Crane by Faller

The only fiddly bit to put together was the hand-crank gear mechanism at the top of the Gantry Crane. I used black thread to simulate steel cable and wound it round a few times on the wheel before attaching the hook you can see dangling at the end.

I used a drop of PVA glue on the thread to stiffen it so that the plastic hook would look like it had some weight as it hung off the end.

Model Kit Faller Gantry Crane
Closeup of the hand-crank detail at the top of the Gantry Crane. I used black thread to simulate steel cable.

The picture on the box suggested that the structure should be painted a brown, wooden color. I wanted it to stand out a bit more on my layout so I went with Model Color's white acrylic paint instead.

I used a thin coat of white paint to allow the underlying grey of the plastic kit to show through, which automatically gave it that aged and weathered look. Piece of cake!

Model Kit Faller Gantry Crane
A view from the top of the Gantry Crane. Note the simple weathering technique I used for the wooden structure.

In this mini-diorama, the Gantry Crane is supposed to look like it is loading lumber from the nearby lumber yard onto the Fleischmann wagon.

The figures pictured here are from Woodland Scenics Dock Workers set.

Model Kit Faller Gantry Crane
The Gantry Crane operator is from Woodland Scenics Dock Workers set in HO scale.
I really like the detail of the the two workers carrying the wooden crate. Makes me want to get out the fine black felt-tip pen to give these two some distinct facial features!

The odd one out from the Dock Workers set is the worker with his hand on his chin. And since he was the only one who appeared to not be doing anything, I decided make him the Gantry Crane operator.

There are few more figures from the Dock Workers set not pictured here because I haven't gotten around to placing them on the layout yet!

Model Kit Faller Gantry Crane
Woodland Scenics Dock Workers unloading crate from the orange Vollmer truck. Note lumber yard to the right of the picture.

The bright orange truck in HO scale is by Vollmer. Looking at it in closeup, I think it would benefit greatly from a detailing and weathering treatment. 

I'll do a tutorial on weathering the Vollmer truck very soon.

More model kit buildings on The Sunny Model Railroad:

Western Homestead Shanty by Life-Like models

Country Chapel by Faller

Sanding Tower Model Kit by Faller

Atlas Picket Fence and Gate Kit

Constance Signal Tower Model Kit by Faller

House Under Construction Model Kit by Faller


Saturday, July 21, 2012

Model Kit | House Under Construction by Faller

I finally got around to painting the wooden frame of the House Under Construction kit by Faller. As I mentioned in an earlier post (circa 2009!), I was planning to get around to painting the shiny, yellow plastic frame of the house a matte, woody color.

Model Kit Faller House Under Construction
Faller's House Under Construction before I painted the wooden frame. Figures are from Woodland Scenics Masonry Workers set.

In the second pic below, you can clearly see the plastic, almost translucent look of what are supposed to be wooden frames.  Will not do..

A couple of years ago, I had already given the walls of the house a brush of matte white paint which I then wiped off with a paper towel. This removed much of the white paint on the brick, leaving a thin, rough layer to simulate bare concrete brick. The white paint also settled into the seams between the bricks, which looked like cement holding the bricks together.

I was pretty happy with the effect, so I left the concrete walls alone. For now, at least.

Model Kit Faller House Under Construction
Closeup of the plastic wooden frames of the house.

I chose Model Color Buff which gives anything plastic the look of freshly cut lumber. And the great thing about Model Color acrylic paints is that cleaning up doesn't require thinners. Paintbrushes rinse out easily under running tap water. Just so long as the paint hasn't had a chance to dry out!

And as you can see from the pics below, I missed a couple of spots. Dang.

Model Kit Faller House Under Construction
Wooden frames of the house painted with Model Color's Buff.
This Faller kit also includes several pieces of tiled roof sections, allowing the model to be built according to various stages of completion. You can even go with a completed, fully-roofed house if you wanted to, but that would hide all that gorgeous detail of the lumber frame underneath.

For my model, I went with the half-tiled roof -- I wanted it to look like the workmen were at least making some progress in building the house. They have, after all, been at it since 2009!

Model Kit Faller House Under Construction
The brick-red tiled roof. I chose the half-tiled roof section from the kit.
You can read about the workmen figures I used in this scene here:

Woodland Scenics | Masonry Workers Model Figures


More model kit buildings on The Sunny Model Railroad:

Western Homestead Shanty by Life-Like models

Country Chapel by Faller

Sanding Tower Model Kit by Faller

Atlas Picket Fence and Gate Kit

Constance Signal Tower Model Kit by Faller

House Under Construction Model Kit by Faller

Gantry Crane Model Kit by Faller


Station Platform by Atlas


Wednesday, July 18, 2012

Model Kit | Telephone Poles by Atlas

Model Railroad Atlas Telephone Poles
Atlas Telephone Poles
Nothing adds realism to a model railroad like telephone poles. There's something about telephone and telegraph poles lining the tracks on a model railway that elevates a hobbyist from 'guy-with-a-big-train-set' to 'serious model railroader'.
And you earn another 1000 points if you're willing to spend hours linking up all the telephone poles on your layout with ultra-fine black nylon thread. But be prepared for those occasional 'Godzilla gets caught in the power cables' moments, if you do.


Model Railroad Telephone Poles
This is one of two versions provided in the box of 12. This telephone pole is one with the additional yard-arm. 

But back to the Telephone Poles by Atlas.

Atlas Telephone Poles come in boxes of 12, pre-assembled and molded in brown plastic. Two types of poles are provided, six with a yard-arms and six without. I'm not exactly sure what the yard-arms are for on the original prototype, but having two types of telephone poles on the layout does help break up the monotony a bit.


Model Railroad Telephone Poles
A Fleischmann passenger train steams past this Atlas Telephone Pole


I painted the wooden sections a woody brown with Humbrol's Dark Earth and the 'ceramic' tips and transformer boxes with ModelColor's Ivory white.


Model Railroad Telephone Poles
A telephone pole by the lumber yard. Note the holes at the base for attaching the pole to the baseboard with track nails. A Fleischmann track cleaning rubber is on the wagon at left.

Atlas was thoughtful enough to provide two holes in the bases of their telephone poles to allow them to be attached to the layout with track nails. I chose to use Fleischmann HO track screws instead of track nails, which do a pretty permanent job of securing each telephone pole to the layout.


Model Railroad Telephone Poles
I've attached this telephone pole with Fleischmann track screws. It'll look a look better once I've concealed the base with some ground cover.

Now to get to stringing up all the poles to each other with fine nylon thread!

But then again, maybe not.

Monday, July 16, 2012

Woodland Scenics | Rusty's Regret Model Car

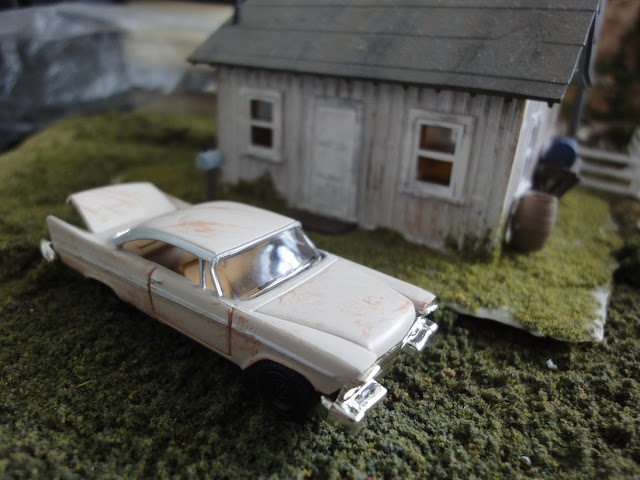
This Porsche has been parked outside the Western Homestead Shanty on my layout for the past three years. You might say I enjoyed the inconguence of a brand-spanking-new car outside the rundown shack.

But what was the story here? 

Woodland Scenics Auto Scenes Vehicles
Life Like Train's Western Homestead Shanty. But why is there a Porsche parked outside?

Had the car been won in a raffle by the occupants of said shanty? Was the shanty a front for some illegal activity? Had someone's cover been blown, and they had to take refuge in a little shack on the Sunny Model Railroad, with the dead giveaway being their baby-blue vehicle parked outside?

And is the lady, hanging the laundry out back, an accomplice to these shenanigans?

Recently rummaging through my e-Hobbyland order from a couple of years ago, I realized that there were still several Atlas and Woodland Scenics models yet to be built.

And I was pleasantly surprised when I rediscovered this Woodland Scenics model car, still sealed in the original packaging. I had totally forgotten about it!  I must have had the shanty in mind when I ordered ol' Rusty.

Woodland Scenics Auto Scenes Vehicles
Woodland Scenics Rusty's Regret from their Auto Scenes collection of cars and vehicles.

Woodland Scenics Rusty's Regret is a nicely detailed model, all plastic, though I wish it were die-cast. It could also do with a little more authentic weathering, which I plan to do soon.

Rusty's going to get even rustier after I'm through.

Woodland Scenics Auto Scenes Vehicles
Rusty's Regret in front of the rundown old shanty. Now that's more like it!

Woodland Scenics Auto Scenes Vehicles
There's a certain charm and melancholy in this picture of Rusty against the setting sun coming through the window.

Looking at these pics, I'm inspired to a lay a sandy driveway in front of the shanty instead of the thick flock of grass where the car now sits. One can never be done working on a model railroad.

Woodland Scenics Auto Scenes Vehicles
This picture brings more of the shanty into focus -- note the weathering on the walls and the barrel detail at the side. And I still have to get around to concealing that plastic base!

More model kit buildings on The Sunny Model Railroad:

Western Homestead Shanty by Life-Like models

Country Chapel by Faller

Sanding Tower Model Kit by Faller

Atlas Picket Fence and Gate Kit

Constance Signal Tower Model Kit by Faller


Saturday, July 14, 2012

Woodland Scenics | Deer Figures

As I mentioned in an earlier post about Adding Figures To A Model Railroad, I enjoy going 'figure shopping' and looking for new things to add to my model railway.

Seeing this Deer set by Woodland Scenics, I immediately knew where I wanted to place them -- behind the Country Chapel on the hill!


Woodland Scenics Deer Figures
Woodland Scenics Deer. The tree stump in the background is included as part of the set. A nice touch!

I wanted to create an idyllic scene next to the Chapel, with shady trees and lush green grass. No surprise that wild deer might find their way here.


Woodland Scenics Deer Figures
A deer and her foal rest under a tree


I made the tall pine trees with Woodland Scenics Tree Armatures gluing on dark green Clump Foliage for the leaves. The light green tree, under which this deer is resting, was part of an architectural landscape model that someone had abandoned next to a stairwell in a carpark! Pretty cool!


Woodland Scenics Deer Figures
Closer view of the found architectural model tree. Note original white paint on the lower leaves.


I managed to salvage some 18 trees in total from that architectural display. Each tree is profesionally made out of twisted metal wire and every one was spray-painted completely white. Go figure.

To blend them into my layout, I first had to paint over the original white paint. I decided to use various shades of dark green and light green -- the light green to give the impression of sprouting new leaves. You can still make out some of the original white paint in this pic. Oops, missed a spot. Or two..

Also included in Woodland Scenics Deer set was this dramatically leaping stag. I attached it to a steep slope with good ol' Scenic Accents glue. Funny thing about this stag -- I occasionally have to re-attach standing figures because they either fall over, or start leaning at a peculiar angle. This stag has maintained its position since the day I put it on my layout in 2010!


Woodland Scenics Deer Figures
The Leaping Stag. Hmm.. sounds like a good name for a whiskey.

And looking at these deer figures up close, I'll need to break out the magnifying glass and super-fine paintbrushes one of these days to give the factory paint-job a little touch up. Those googly eyes are starting to bother me..

See my earlier post about building the Country Chapel model kit by Faller.

Friday, July 13, 2012

Model Kit | Model Railroad Sanding Tower by Faller

A quantity of sand was carried by trains to prevent their wheels from slipping on the track, providing the necessary friction when the track was wet or oily. The sanding tower loaded sand into a dome situated above the boiler of steam locomotives, where heat from the boiler kept the sand dry. The sanding valve was operated by the train engineer and air pressure dropped dry sand onto the rails just in front of the wheels.

Model Railroad Sanding Tower
Sanding Tower by Faller

This Sanding Tower model kit by Faller was pretty complicated to put together but thankfully, the instruction sheet was fairly clear as to where all the various bits were supposed to go.

Model Railroad Sanding Tower
Railway man looks off into the distance from atop the Sanding Tower, contemplating his existence on the Sunny Model Railroad

I used Tamiya Extra-Thin Cement for this kit which helped cut down on the potential mess factor. The great thing about Tamiya Extra-Thin Cement is that it is applied with a brush, giving you ultimate control over how much cement you need use. For a model such as Faller's Sanding Tower which is made up mostly of a complex mesh of very thin plastic struts, the lesser the amount of cement used, the better. You also don't get the unsightly blobs at the joints such as when cement from a tube is used.

Model Railroad Sanding Tower
A railway man leaps from the second strut of Sanding Tower instead of using the ladder. Note rust weathering on the tower. Also note globs of Scenic Accents Glue used to attach the figure to the Tower. These close-up pics sure do bring out details I would otherwise miss.

True to the prototype, I painted the Sanding Tower kit with Model Color's Basalt Grey. Weathering was done with a light dry-brushing of rust red to simulate, well.. rust.

Scenic Accents Glue was used to attach the figures to the Sanding Tower. The great thing about Scenic Accents Glue is that it doesn't dry out and remains tacky, allowing easy re-positioning of figures on a layout.

Model Railroad Sanding Tower
Another view of the top of the Sanding Tower. Again Scenic Accents Glue used to affix the figure is clearly seen around his shoes.
As you can see in the pics, I used perhaps a little too much Scenic Accents Glue, something that only shows up in these close-up pics. Cleaning up the excess glue will be easy though -- just pluck them off with tweezers. I'll need to get out my magnifying glass for this purpose though. These eyes ain't what they used to be.

Model Railroad Sanding Tower
A view of the Sanding Tower from the ground at evening time. I was also testing the Fleischmann bulb in the Constance Signal Tower in this picture.
I still have to get around to levelling the Sanding Tower with the baseboard and attaching it permanently, blending in the base of the tower so that it is nearly flush with the groundcover.

More model kit buildings on The Sunny Model Railroad:

Western Homestead Shanty by Life-Like models

Country Chapel by Faller

Atlas Picket Fence and Gate Kit

Constance Signal Tower Model Kit by Faller

Thursday, July 12, 2012

Model Kit | Constance Signal Tower by Faller

It's been awhile (three years!) since the Sunny Model Railroad site was updated, and I can't think of a better topic to write about than this Constance Signal Tower model kit by Faller Gmbh.

This highly detailed kit is faithfully modelled after the original Constance Signal Tower that was built in 1886. The original Constance -- or Konstanz, in German -- is preserved in its original colors, in a railway museum in Blumberg, Germany.


Model Railroad Constance Signal Tower
Constance Signal Tower by Faller
Following the protoype, I painted the walls the original signal yellow and the roof a dark red. I did some simple weathering of the yellow walls and red roof with some black and brown crayon, and a quick brush with very dilute india ink. I've always liked weathering with india ink as it also brings out the detail of model kits -- details you probably would never notice if the kit was painted a basic single color.

I took some liberty with the window frames, metal supports and ladder and painted them metallic silver instead of the dull blue-gray of the original. I felt that silver paint would make the model stand out better on the layout.


Model Railroad Constance Signal Tower
A Fleischmann goods train passes under the Constance signal tower. Moose not included with the kit! 

This kit comes with transparent plastic sheets which are glued behind the window frames to create the impression of glass windows. I also installed a Fleischmann light bulb inside the tower which will be lit with its own on-off switch once I'm done sorting out the electrical wiring for all the buildings under the baseboard of my layout. Whenever that will be.

The figures in these pics are from Woodland Scenics Train Personnel set in HO scale.


Model Railroad Constance Signal Tower
A railway man signals to his colleague to get the moose away from the tracks!


Model Railroad Constance Signal Tower
Someone had better get 'round to trimming the grass near those tracks.


Like most Faller kits, the instructions that came with model were not very clear and some of the important parts did not fit together like they should have. This kit is not for beginners! More experienced model builders will enjoy the challenge though, and once the Constance Signal Tower is up with trains running under it, it adds a nice bit of historical detail to any layout.


Model Railroad Constance Signal Tower
Another view of the moose and her calf.


More model kit buildings on The Sunny Model Railroad:

Western Homestead Shanty by Life-Like models

Country Chapel by Faller

Sanding Tower Model Kit by Faller

Atlas Picket Fence and Gate Kit

LinkWithin

Related Posts Plugin for WordPress, Blogger...