Thursday, May 28, 2009

Model Railroading | Attaching Fleischmann Profi-Track to the Baseboard

This was the method I used to attach the Fleischmann Profi-Track to my baseboard.

Fleischmann Profi-Track has a plastic roadbed molded onto the track to simulate ballast. This saves us the trouble of ballasting the track ourselves with PVA glue and fine modelling ballast which can get messy. Really messy.

And ballasting your own track it makes it nearly impossible to remove later, without damaging it, should you want to remodel and change your layout.


HO Train Layouts Profi Track
Incredible detail of the ballast stones on the roadbed of every Fleischmann track 

I'm really a fan of the Fleischmann system because of the high degree of detail on all their products, both train and track.

Above is a pic of the detail in the roadbed. You can literally count every ballast stone!

And you can also see the fine wood grain detail on the railway ties to boot!

Using 3M 4011 Exterior Mounting Tape attached to the underside of the trackbed, I fastened the track to the foam level of the baseboard. 3M 4011 is made of some sort of rubberized material, is extremely sticky and very, very strong. As an unexpected benefit it also has sound dampening properties for quieter running.

And the good thing is that if I ever decide to re-do my layout -- which will not be too far into the future -- I can simply pry off the track without damaging it.


HO Train Layouts Profi Track
3M Exterior Mounting Tape


HO Train Layouts Profi Track
Attaching 3M Exterior Mounting Tape to the bottom of Fleischmann track.


Saturday, May 23, 2009

Woodland Scenics | Adding Rail Worker Model Figures to a Model Railroad

I enjoy adding HO scale figures to my railroad layout, creating miniature scenes that add tiny pockets of activity and detail. Each one tells its own story!

Sometimes I'll go 'figure shopping' and look through the display rack to see what catches my attention -- that alone is enough to trigger the imagination and create ideas for possible new scenes I wouldn't otherwise have thought of.

Woodland Scenics Model Figures
Railway workers at work on a damaged sleeper.

Here I've depicted railroad workers repairing a damaged railroad sleeper and installing the new tie. The figures are from the Scenic Accents Rail Workers set and are affixed into their standing positions with Accent Glue.

Woodland Scenics Model Figures
Woodland Scenics Rail Workers


<><>
<><>
Woodland Scenics Model Figures
Notice the ground cover which is made up of layers of Woodland Scenics Earth Blend and Fine Turf 


I have a gap of one sleeper in my layout from where I attached Fleischman flex track to the regular Profi-Track. The metal rail itself is connected so that section of the track is perfectly functional. Having these railway workers work on the track, so to speak, sort of explains the missing sleeper.

One worker is even carrying the replacement sleeper on his shoulder!


<><>
<><>
Woodland Scenics Model Figures
Rail worker carries a sleeper on his shoulder


<><>
<><>
Woodland Scenics Model Figures
Woodland Scenics Rail Workers set includes a Hand Cart, seen here on the tracks in the background 


I'm all thumbs when handling tiny objects and trying to glue them down and this is where Woodland Scenics Gentle Grips come in pretty handy. Gentle Grips are tweezers with rubber tips that are umm.. gentle, and will not chip off paint like regular metal tweezers might. The rubber tips also give you a good grip on any tiny object you might be trying to grapple with.

Wednesday, May 20, 2009

Model Railroading | Model Train Help 4th Edition E-Book Review

Model RailroadingModel Train Help by Robert Anderson was one of the first ebooks on model railroads I purchased.

Divided into 6 parts on 6 separate pdf files, the tutorial-styled content brings the reader step-by-step through an extensive array of topics while providing many handy tips along the way.

Although this may vary depending on your level of experience, these are some of the topics that I found most useful:

Part 1:
  • The different model scales including references to the mostly British OO and O scales
  • Track gauges and their differences
  • Steel, brass, zinc-coated and nickel silver track and a photo tutorial on how to ballast track
Part 2:
  • Analog, DCC and locomotive decoders
  • What to look out for when buying locomotives and rolling stock, both good and bad
  • A photo tutorial on couplers, types and installation
  • How to build a baseboard and frame
  • Different layout plans for point to point, oval and out and back
Part 3:
  • Modeling landscape scenery including building tunnels and mountains, making rocks, lakes, and waterfalls, adding grass cover and making realistic trees
  • Adding buildings to your layout
  • Basic weathering techniques
Part 4:
  • Track cleaning methods
  • Wiring a reverse loop and wiring for 2 train operation
  • Hot frogs and insulated frogs (turnouts)
  • Calculating sloping grades for steepness
  • Track code and their meaning
Part 5:
  • Railroad yard design
  • Garden railroads and G scale
  • Airbrushing and spraying techniques
Part 6:
  • An array of model railroad plans in various sizes
Granted that a fair bit of the information you will find in this ebook can be found scattered throughout the internet, Model Train Help nonetheless proves to be a valuable and organized one-stop resource of useful and useable content.

Tuesday, May 19, 2009

Model Railroad Scenery | Creating A Realistic Lake Feature

I've always been fascinated by the realistic looking lakes and rivers I've seen on model railroads.

When it came to building the Sunny Model Railroad, I initially had plans to create a waterfall on the far left corner of the layout. After considering the amount of additional space a convincing looking waterfall would need and then looking at the space that I had to work with, I settled on a lake scene instead.

I imagined swaying palm trees, a man-made sandy beach and sunbathers and swimmers out to have some fun in the sun. I also envisioned a place nearby where they would park their cars and camper vans..

But back to how I created this pool of artificial water.

After much research and deliberation, I decided to go with Envirotex polymer resin to create artificial water the for the lake scene on my model railroad.

Envirotex comes in two liquid parts, the resin and the hardener. When the two components are mixed vigorously together it forms a paste that dries clear in about 72 hours.


Model Railroad Scenery
Building up 'water' in a model lake layer by layer with Envirotex. A few more layers left to go.


After I poured the mixture, and while it was still wet, I added the Woodland Scenics Field Grass to represent long water grasses you see in the pic.


Model Railroad Scenery
Adding Woodland Scenics Field Grass along the bank of the lake


We have to add Envirotex in several thin layers, giving each layer time to dry before adding the next layer to ensure that the product dries completely. The pic you see is the depth of the lake after pouring in the third layer.


Model Railroad Scenery
More Field Grass added. The 'rocks' at the bottom of the lake are actually cork chips!


Meanwhile, I'm trying to figure out how best to create model HO scale fish which I can add to the lake. I'll then pour one final layer of resin over the fish for the final depth.

During the curing I covered the drying resin with the lid of a train set box. This was to prevent dust and loose scenery particles from settling on the surface of the drying resin and becoming a permanent fixture.

There are, of course, other alternatives to Envirotex.

Products by Woodland Scenics such as their Realistic Water come ready-mixed in thick liquid form and only have to be poured on and left to dry. They also have another product called E-Z Water which comes in the form of resin chips that have to be heated and melted over a stove.

I've tried Realistic Water and can say that the clarity and surface sheen of the cured product seems as good as Envirotex. I also misplaced a bag of E-Z Water that I had purchased early on --- which is probably a blessing in disguise. Molten resin is something I don't think I should be messing with..

I'll be adding more details to the lake scene very soon. Stay tuned!

Saturday, May 16, 2009

Model Railroading | Track Curve Radiuses with Fleischmann Profi-Track

This pic shows the upper and lower curves on the left of my split-level Fleischmann model railway. Both loops are completely independent of each other, with separate Fleischmann controllers.

 I'm using Fleischmann Profi-Track radiused at 420mm (16.5") for the lower track and 356.5mm (14") for the upper layer.

I recently posted this pic on http://www.modelrailroadforums.com/ and one of the readers commented that he was amazed that I was able to get this steam engine to take the upper tighter curve. Well, actually, he was doubtful if my trains managed to make that tight a curve.

But hey, this is Fleischmann, baby!


HO Train Layouts
One of my Fleischmann trains approaching a curve

I'm not familiar with American model trains, having never owned one. But it's something I will have to bear in mind if I plan on running a US-made model train with a longer wheelbase on my layout.


HO Train Layouts
Making the curve in Windmill Valley..


So far I've never had a train derail on my layout -- ever. That's another one up for German engineering I suppose.


HO Train Layouts
Love the detail on these Fleischmann trains!


HO Train Layouts
And round she goes, Fleischmann rolling stock in tow


Model Kit | Busch Oxeye Daisies


These are the Oxeye Daisies by Busch. At 1/87 scale, a keen eye and tweezers are required for putting these babies together..

Model Kit Busch
Busch Oxeye Daisies

This kit requires first painting the ends of the stalks a rust red before assembling the flower petals. These will form the center of each flower.

Then, the ring of petals (thankfully molded in yellow plastic) is slipped on the end of each stalk with a tiny bit of glue to form a complete flower. Each flower stalk is then glued on to the base. Definitely not for the faint of heart or weak of eye.

For an idea of the scale of these flowers, the fabric this model is sitting on is 300 thread cotton!

I placed the daisy beds on either side of the front entrance to the Chapel on the Hill. I imagine they are tended to by the local friar, perhaps?


<><>
<><>
Model Kit Busch
Busch Oxeye Daisy at the entrance to the Chapel on the Hill


Looking at the detail of this pic, I'm reminded that I need to cover the green plastic bases of the daisy flower beds with fine Earth Blend.

And I'm glad I had my Woodland Scenics Gentle Grips tweezers for this task!


Wednesday, May 13, 2009

Woodland Scenics | Masonry Workers Model Figures

Woodland Scenics makes a good line of pre-painted of scenic figures as part of their Scenic Accents range.
The worker shovelling sand into the cement mixer is from Woodland Scenics Masonry Workers set.

Woodland Scenics Model Figures
A worker shovels sand into the cement mixer. I used fine quartz sand -- but not fine enough for 1/87 scale!

For the sand I used decorative quartz sand from Ikea which is the finest white sand I've been able to find, but still a bit too large in grain size for HO.

Woodland Scenics Model Figures
Closeup of the not-so-fine sand. I'll need to grind these up finer somehow.

The pics below show the complete scene of masonry workers building a cottage.

This cottage kit originally came with shiny grey plastic 'brick' sides.

I brought out the brick detail by painting the shiny grey brick with a dilute coat of matte white first. Then, while the paint was still wet, I wiped off the surface, leaving the white paint in the crevices to enhance the outline of the bricks. The thin layer of matte white also got rid of the plasticy shine.

I've yet to paint the wooden frame of the roof though. Details, details....

Woodland Scenics Model Figures
A lone deer looks on as the workmen go about their job

Woodland Scenics Model Figures
I'll need to paint the wooden frame of the house to get rid of that plasticy look.

When time (and patience) permit I intend to re-paint and detail the figures on my layout, perhaps down to the facial features. But more on that later..


More model kit buildings on The Sunny Model Railroad:

Western Homestead Shanty by Life-Like models

Country Chapel by Faller

Sanding Tower Model Kit by Faller

Atlas Picket Fence and Gate Kit

Constance Signal Tower Model Kit by Faller

Monday, May 11, 2009

Model Railroading | Track Maintenance and Keeping Rails Clean

I learned early on the importance of keeping the track clean. Oxidization as well as dust accumulating on the nickel rails slows trains down, while especially dirty sections of the layout may stop them, quite literally, in their tracks!

Dirt and oxidation inhibits the electrical contact between the rails and the wheels of the locomotive. And if you have steel track on your layout, be prepared to perform frequent track cleaning to keep rust at bay!


Model Railroad Track Cleaning
Fleischmann Track Cleaning Wagon

Some common symptoms of dirty track:


  • The engine seems to lack power in certain sections of track and then suddenly lunges forward

  • At lower speed settings on the controller, the engine is at a standstill

  • The locomotive doesn't move at all

The above usually occur when we haven't run our trains for several weeks, when there is an increase in humidity or when we've just done scenic work. The PVA glue used in attaching scenery to a layout forms a thin, non-conductive layer if it should find its way onto the rails.

My method for cleaning track is to rub a piece of balsa wood on the offending section, followed up with a thorough rubdown woth some cloth swabs soaked in isopropyl alcohol.


Model Railroad Track Cleaning
A simple piece of balsa wood is abrasive enough for basic track cleaning


The balsa really helps in removing some of the more stubborn crud and doesn't leave any residue like track rubber cleaners do. Fine grains of rubber residue can get caught in our engine or wheel mechanism.

But if you do use a track rubber, vacuum up any remaining residue and you should be fine. I have a small, handheld, battery-operated vacuum cleaner used for getting at hard to reach crevices between the keys on computer keyboards. It's not too powerful and will not rip up the scenery like a household vacuum cleaner would!

If you have steel track, I wouldn't recommend regular, routine use of steel wool. It should only be used on very stubborn rust spots. Steel wool is very abrasive, much more so than track rubber, and using leaves tiny scratches in the rail that will only fill with more crud and rust in future. It's a good idea to go over the track area with a magnet to pick up any fine scraps of steel wool after you're done cleaning your track.

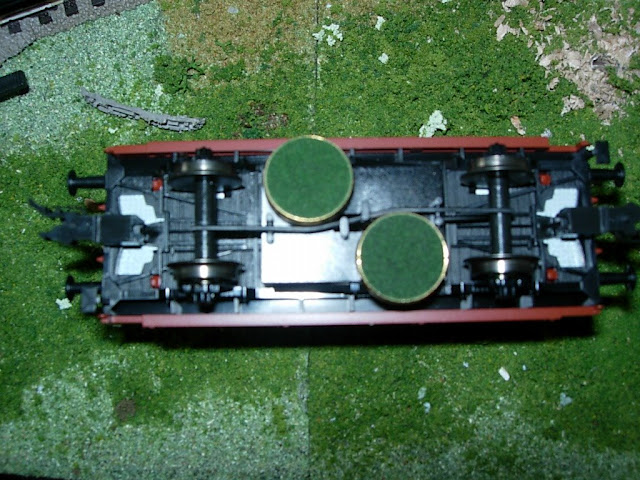
I routinely run my Fleischmann track cleaning wagon round my layout every now and then. It has rotating cleaning pads made of a soft felt material that are good for gentle maintenance but not as a substitute for balsa and alcohol.


Model Railroad Track Cleaning
Replaceable green felt pads under the Fleischmann Track Cleaning Wagon


Sunday, May 10, 2009

Model Railroad Scenery | Tunnels and Blue Foam

The first pic below shows the mountain tunnel exit on the upper level of my layout. I like to use various coarse turfs to accent the craggy rock -- these are by Woodland Scenics which I think look very natural in color and texture.

The 'stone' tunnel portals on my layout are by Hornby and Faller -- nice detail on both.


Model Railroad Scenery
Fleischmann train exiting the tunnel cut out of the mountain

It's always a good idea to apply matte black paint to the inside of tunnels otherwise the foundational material (in this case, blue foam) is obviously visible. Matte black art paper would work just as well for this purpose.


Model Railroad Scenery
Note the tight clearance of the carriage exiting the tunnel. Just enough room!


You can just make out the blue foam in the tunnel as the train on the lower deck approaches in the pic below. I used high-density blue foam for the foundation of all the scenery on The Sunny Model Railroad.


Model Railroad Scenery
Blue foam in the tunnel is visible as this Fleischmann passenger train approaches


The good thing about documenting this layout in progress is that I get to notice details and flaws that the camera captures.


Model Railroad Scenery
Fleischmann train entering the tunnel below Windmill Hill  

The fourth pic above shows the other tunnel at the opposite end. I hadn't originally planned for this tunnel but I needed a place to mount the Pola windmill and building set I had purchased on impulse.

Necessity, they say, is the mother of invention.

So, I set to work with -- what else -- blue foam and created a tunnel for the Pola Windmill kit to sit on. I tried out a product called Celluclay instead of plaster for the landscape rock base. Celluclay is an instant, just-add-water paper mache product. And it took forever to dry. No kidding. It must've taken 2 weeks at least before I could paint it.

In the process it developed black and grey mold and mildew. Celluclay probably works well for small projects and, according to the instructions, can be dried in an oven. I had slapped it on pretty thick like I would plaster, which is obviously not the way to use it. The whole thing was also too large to fit in my oven. Not to mention the noxious fumes that burning blue foam would emit.

Gotta love that blue foam.

Saturday, May 9, 2009

Model Railroad Scenery | Creating Depth When Coloring Rock Detail

I have two basic techniques that I use to color rock on my model railroad.

In the first pic below, I painted the rock with Nippon matte tan water-based paint. Some folks dilute the paint before applying but since my foundation is blue extruded foam, I would probable have had to go over it several times to completely conceal any exposed blue areas if I had diluted.


Model Railroad Scenery
Matte tan paint is the base color on The Sunny Model Railroad 

To create some definition, I then brushed over a wash of grey slate acrylic paint. The dark wash gets into the crevices of the plaster and brings out more detail. For a more striking effect you could also use very dilute india ink.

For the rock canyon detail in the second pic below, I colored the white plaster sparingly to make it look 'brighter' since it was in the background of my layout.

Lighter colors on rock occuring in the distance creates greater 'depth of field', giving the illusion that the structure is farther away. This is something that I stumbled on by sheer accident but it is a concept that I make a point of applying throughout the entire layout.


Model Railroad Scenery
To create the illusion of distance, color the rock a lighter shade than the rock in the foreground


To color this rock I used a light stain of yellow oxide acrylic paint using a dabbing technique. I then very sparingly applied dilute raw umber for some contrast. Finally I applied a very dilute slate grey acrylic wash, deliberately leaving some areas lighter, allowing the white of the plaster to dominate.


Model Railroad Scenery
The morning sun on the rock landscape 


Model Railroad Scenery
Another view of the rock landscape, this time through the trees


Friday, May 8, 2009

Model Railroad Scenery | How To Model Realistic Looking Rock Structures

And yet another article about model railroad scenery I contributed online:

If you've ever marveled at realistic looking rock scenery on model railroads and wondered how they were created, this article describes in detail how you too can easily achieve the same results.

Model Railroad Scenery
Rock structures are used to accent the landscape and add interest to the model railway layout

These are the items you will need:

· Newspaper
· Masking tape
· Plaster of Paris or Hydrocal plaster
· Acrylic paints in burnt umber, raw umber, raw sienna, white and slate grey colors
· Art paint brush and craft sponge brush
· Assorted items for shaping plaster, such as spatulas and plastic knives

The first step is deciding where that rock face, outcropping or rocky hill will be on your model railroad layout. Unless you're modeling a section of the Grand Canyon, bear in mind that rock structures usually emerge from areas of foliage and greenery. And it is precisely this contrast that makes the scene look interesting and real.

Before you proceed any further, cover any areas on your layout near the section you're planning to work on. Wet plaster drips and tends to get on everything no matter how careful you are.

Whenever I work with plaster, I tape over my railroad tracks with painter's masking tape and cover larger areas with cling wrap or aluminum foil. Aluminum foil is also great because, for this purpose, it's reusable.

Model Railroad Scenery
Using ClingWrap and blue 3M Painters Tape to protect the track from stray drips of wet plaster

Once you have decided on the placement of your rock scenery, make up several wads of small pieces of newspaper. On my HO scale layout I use sizes varying from 2 to 4 inches in length, in varying thicknesses. Use a size that you think is best for your layout scale. Larger wads will create bigger outcroppings on the rock face. Using masking tape, attach the wads of newspaper to the area where the rock outcroppings will be.

Cover the wads completely with the masking tape. Try to go for a layered arrangement that looks random and not man-made.

Model Railroad Scenery
Wads of newspaper will form rock outcroppings on the model railroad once covered with plaster and ground cover

Don't worry, it will look much better and come together with a very natural look after you complete the next few steps.

Mix up some Plaster of Paris or Hydrocal plaster following the instructions on the packaging. Hydrocal is very lightweight but considerably more expensive than Plaster of Paris.

Plaster sets quickly so mix up smaller quantities and work with it in small batches. Be sure to thoroughly rinse out the mixing container and spatula between batches as any dried residue plaster will interfere with how the new batch sets up.

Now comes the fun, albeit messy bit.

Using a spatula, apply plaster over the newspaper and masking tape wads. Remember to keep the texture random -- smooth in some areas, craggy in others. Use a plastic knife to add more detail to the rock face with vertical or horizontal striations. Notice how the newspaper wads beneath the surface give the rock a three-dimensional look.

Stand back, admire your handiwork and let the plaster dry overnight.

Adding color to our rock is the final step to complete scenic realism. I usually choose a combination of raw sienna, raw umber, burnt umber and slate grey acrylic paints. The colors should be diluted with water to a thin wash so that we are not actually painting the rock but staining it.

Using a paint brush or sponge brush, apply the washes in a random series of spots of burnt umber, raw umber and raw sienna. Go easy on the darker colors as they tend to dominate and, if overused, can make your scenery look somewhat somber. Then, apply a very dilute wash of slate grey over the whole rock face and over the other colors. The grey wash unifies the other color combinations into a very realistic look.

Finally, very sparingly dry brush undiluted white acrylic paint in areas for highlights and to create a sun-bleached effect.


Model Railroad Scenery
A shepherd watches over his flock of sheep from a rock outcropping. The rock was created by layering plaster over wads of  newspaper and then 'textured' by creating rock-like random patterns with a fork and a spatula. Shepherd and sheep figures are by Noch.

As you can see, it doesn't take exceptional artistic talent to create realistic looking rock on your model railroad layout. But use these ideas as a starting point and feel free to experiment with ideas of your own. Try different materials and coloring techniques. You'll be pleasantly surprised at what you may come with.

And don't forget, as scenic modelers we must constantly observe nature for an infinite supply of new ideas.

Thursday, May 7, 2009

Designing a Model Railroad Layout for Maximum Action In A Minimal Space

Here's an article that I published online recently:

Gleefully unwrapping that large package on Christmas morning and discovering a toy train set within must surely be a cherished childhood memory for many a model train enthusiast. Setting it up on the floor, with Dad's help of course, the next couple of hours were spent watching the locomotive and its parade of coaches and wagons circle that oval of track endlessly, its purpose and destination limited only by our imaginations.

Fast forward 30 years and we decide that it would be a fun hobby to get into. But this time we would take it seriously.


HO Train Layouts
Upper track level of The Sunny Model Railroad

We have our eye on that highly-detailed miniature steam locomotive with the multiple carriages. We scour the net for information looking for the best track to buy and read up on baseboard construction while aspiring to create scenery that can rival, in miniature, anything that man or Mother Nature could create.

Most importantly we've gotten approval from our other half to setup our dream layout in a part of the house that will henceforth become own little railroad sanctuary. The next step is a visit, or several, to our favorite hobby shop. We leave contented, wallets lightened and a little deeper in credit card debt.

For those of us fortunate enough to have a large loft, garage or spare room in which to pursue our grand design, we have hundreds of track layouts to choose from, with a myriad variations of each. Oh, the possibilities!

But if, like me, you live in a small 2-bedroom apartment and you do not have the luxury of a 12-foot straight run with 6-foot turns, that tiny 6'x3' oval is not going to hold ones interest for very long.

Enter the two-tiered double loop. This is exactly what I created on my 6'3" x 3'6" layout in HO scale.


HO Train Layouts
Fleischman trains on the upper and lower deck of the model railway. Both tracks are independent of each other
Consisting of two independent loops powered by separate transformers, the lower loop is an irregular oval with a short siding. The second elevated layer is a modified dog bone, switchable to a straight pass, also with a short siding. A single layered double loop would not have fit on a layout this size but this limitation turned out to be a blessing in disguise. I now have a more complex and interesting layout especially with the double levels.

I created two separate tunnels for the lower oval, one through the mountain and another at the opposite end so that the steam passenger train is visible maybe only two-thirds of the time as it winds its way around the track. To add realism I can stop the train in one of the tunnels and delay its exit to create the illusion that the train is traveling a far greater distance.

On the upper layer, a goods train passes through its own tunnel in the mountainside and then past a signal-control tower with the possibility of some simple switching on the siding.
Possibly the best part of this system is that the trains are controlled independently -- all without the aid of Digital Command Control!

Because of the split-level, the center of the layout forms a meadow valley and this is where I'm constantly trying out new ideas and themes hoping to get really creative with my landscaping. As it stands, a farmer watches over his flock of sheep as they graze on marigolds. Some distance away, workmen are at work building a small cottage. Further away still, the dazzling white quartz sand of a man-made beach fronting a lake lined with tall water-grasses awaits its holiday-makers. All in all, a model railroad is a continual work in progress that one secretly hopes will never be done.

Having squeezed a fair amount of train action out of my limited space in HO scale I can't help but think that if I had a chance to do it all over again, N scale would be my choice. Oh, the possibilities!

Model Kit | Faller Country Chapel with Scenic Accents

This is the Country Chapel model kit by Faller.

The kit comes pre-colored but I decided to give it a go over anyway with similar colored paints. I guess I can't get over the plasticy sheen of an unpainted kit. Interestingly enough, Model Color's Field Blue matched the original colored plastic of the roof of the chapel exactly! The white walls were painted with MC's Ivory White.

Model Kit Faller
Country Chapel model kit by Faller
The bronzed plastic of the bell tower looked pretty good so I left it alone.

For a couple of weeks, that is, before I decided to give it a once over with Humbrol 171 Antique Bronze. Ah, much better..
<>
<>
Model Kit Faller
Bell steeple painted with Humbrol Antique Bronze


I did some simple weathering to this structure which involved using black and brown crayons on the white walls. Black crayon is also great for crisping up some of the details -- I use it on corners and for structural accents. The exposed brick effect was accomplished by dry-brushing matt dark red paint.

I created the vine effect on the side walls by drawing thin lines of PVA glue with a toothpick and then sprinkling light-green Woodland Scenics Fine Turf over the area. The glue lines catch the turf while the excess falls away, creating the 'vine' effect.

Model Kit Faller
Vine on the chapel walls created with PVA glue and Woodland Scenics Fine Turf

I spent a good part of my pre-adolescence building model planes, tanks and ships by the likes of Airfix, Revell and Tamiya. I found the quality, fit and detail pretty good overall.

Airfix and Revell were in my opinion the best as far as fit -- the parts all went seamlessley together 99% of the time. Tamiya led the pack (back then in the late 70s) as far as detail but the parts at times did not fit together perfectly and a certain amount of modification with an X-acto blade and glue was required.

Having come into model railroading and finding myself once again working with model kits, I can say for a fact that the scenic models that I've worked with so far do not even come close as far as detail or quality of fit to the brands I mentioned earlier. A lot of times, parts to be have to be glued together 'freehand' -- no alignment guides are molded on the plastic to align the pieces together.

On the bell tower on this model for example, it would have been the industry standard to provide guide 'nibs and holes' to align the steeple on top of the wooden framework. Instead one has to slap on a liberal amount of glue and align the steeple to the frame by eye, making fine adjustments before the glue has a chance to completely dry.


<>
<>
Model Kit Faller
The Country Chapel as it appears on the layout. Don't ask how the congregation is supposed to get up that hill.. 


Instructions are also often unclear, or completely lacking, and one has to reference the picture on the box for clues. Oh well, these manufacturers must give us model railwaymen too much credit as far as our kit-building skills. If only Tamiya were to enter the model railroad market..

<>
<>
Model Kit Faller
Distant view of the Country Chapel


Post afterthought:
Having said all that, I do find that the LifeLike Trains and Atlas plastic kits that I've recently worked on to be of good quality, with precision fit and detail an experienced kit modeller would come to expect.

More model kit buildings on The Sunny Model Railroad:

Western Homestead Shanty by Life-Like models

Country Chapel by Faller

Sanding Tower Model Kit by Faller

Atlas Picket Fence and Gate Kit

Constance Signal Tower Model Kit by Faller


Monday, May 4, 2009

Model Kit | Western Homestead Shanty by Life-Like Trains

This is a Life-Like Trains model of a Western Homestead Shanty. The kit came in pristine white with a grey roof so I decided to do some simple weathering to make it look more realistic.

Model Kit Life Like Trains
Laundry day at the shanty. But seriously, who would live here?

I first painted the walls with Model Color Ivory. The Model Color series of paints comes in little plastic bottles. They wash off with water when still wet which is great when cleaning brushes. I thought that the slate grey finish on the roof that came stock with the kit looked pretty good so I decided to not repaint it.


<><><><>
<><><><>
Model Kit Life Like Trains
Glaring white plastic walls weathered to look like the real thing. Note rust stains on the walls below the pipes.


To weather the walls I wet-brushed very dilute India ink to bring out the 'grain' of the wood -- these kits are finely detailed! Using tissue paper I dabbed off the excess so that it wouldn't appear too dark.

I then drybrushed Humbrol Matt Black 33, Matt Earth 29 and Model Color Basalt Grey very sparingly. To add rust to the pipes I used Humbrol Matt Rust 113 which I find comes very close to the real thing. I also drybrushed some of the Rust onto the walls below the pipes to give the impression of rust stains. I drybrushed in streaks the same colors for the roof.

To create creeping grass on the sides of the shanty's walls I used a toothpick to finely smear a small quantity of PVA glue and then sprinkled Woodland Scenics light green fine turf. You can even create vines by drawing hairlines of PVA with a toothpick and then sprinkling fine turf. The turf will adhere to the fine lines of PVA and look like vines.

Model Kit Life Like Trains
But what's that blue Porsche doing in front of the Shanty?


Lastly, I used white thread for the clotheslines and hung the 'laundry' supplied with the kit.

Looking at these pics reminds me that I have to get around to concealing the edges of the plastic base by blending it into the turf.


More model kit buildings on The Sunny Model Railroad:

Country Chapel by Faller

Sanding Tower Model Kit by Faller

Atlas Picket Fence and Gate Kit

Constance Signal Tower Model Kit by Faller

Sunday, May 3, 2009

Model Railroad Scenery | Plaster, Paint and Ground Cover

The stack of newspaper wads from the previous post has been transformed into the mountain scene you see below.

Unfortunately, I didn't take any pics of the creation process -- I had my hands covered in wet plaster!

Model Railroad Scenery
View of the completed mountain. Hard to believe it's just a wad of newspaper covered in plaster.  

Basically it involved covering the paper wads in plaster cloth (I used two brands, Woodland Scenics and Activa Rigid-Wrap, which are basically the same, as well as being similarly expensive!), painting it over with a matte tan paint and then adding ground cover of various textures and colors.

Nothing in scenic nature is uniform or consistent so I used as many ground cover colors and textures as I could obtain.

For added texture in areas devoid of ground cover, I used plaster of paris to create the rough, rocky detail you see in the second pic below.


Model Railroad Scenery
Burnt umber, raw sienna and a light brush with dilute india ink turns the white plaster into something resembling rock. 

When the plaster thoroughly dried, I used applied dilute burnt umber and raw sienna acrylic paints, using the 'leopard-spot' technique. This involves using a sponge brush and dabbing the various colors on in a random pattern of spots.

Then, using very dilute india ink, I brushed a wash over the whole thing. The india ink gets into the little crevices and brings out the detail of the 'rock'. A very important step!  

Instant realism!

Model Railroad Scenery
A Fleischmann goods train rolls past a plaster rock face.

LinkWithin

Related Posts Plugin for WordPress, Blogger...